DocBook – Installation et utilisation de base

  • Cet article: Installation et utilisation de base.
  • Utilisation avancée et amélioration de la présentation en HTML
  • Utilisation avancée et amélioration de la présentation en PDF
  • Créer le contenu du document
  • Pré-requis: Connaissance de base de XML et ses feuilles de style XSL. Une connaissance des principes suffit.

    Installation sur un système Ubuntu/Debian ou compatible.

    Pour une installation minimale qui permet de générer des documents au format html et pdf, exécuter:
    sudo apt-get install xsltproc fop docbook-xsl
    
    Cette commande installe les trois paquets:
    • xsltproc : Processeur de feuilles de styles XSLT
    • fop: Moteur de transformation au format PDF.
    • docbook-xsl: ensemble de feuilles de syle xsl du système DocBook. Cet ensemble est installé dans: /usr/share/xml/docbook/stylesheet/nwalsh/

    Création du document.

    Le contenu du document à créer doit être saisi au format XML en respectant le formalisme DocBook. Ce formalisme est constitué par un ensemble de balises XML organisées selon une structure pré-définie. Concrètement, il faut utiliser un éditeur de texte pour créer un fichier qui s’appelle document.xml (à titre d’exemple, car le nom peut être quelconque).
    vi document.xml
    
    Ensuite saisir le contenu:
    <?xml version="1.0" encoding="UTF-8"?>
    <book xml:id="doc" xmlns="http://docbook.org/ns/docbook" version="5.0" lang="fr">
    </book>
    
    Ceci crée un document conforme aux spécifications DocBook mais vide. On reconnait en première ligne l’en-tête d’un fichier XML qui indique la version XML utilisée et l’encodage du texte (UTF-8, recommandé). La 2eme et la 3eme lignes constituent respectivement les balises de début et de fin du document. La 2eme ligne contient les paramètres principaux du document créée:
    • xml:id : Identifiant unique du document
    • xmlns : l’url du namespace DocBook, utiliser toujours http://docbook.org/ns/docbook
    • version: Version de DocBook utilisée, actuellement 5.0 est la version stable.
    • lang: Code ISO de la langue du document.
    Enregistrer le fichier puis exécuter:
    xsltproc -o document.html /usr/share/xml/docbook/stylesheet/nwalsh/xhtml/docbook.xsl document.xml
    
    Il s’agit d’un appel au processeur xslt, xsltproc, avec trois paramètres:
    • -o : Indique le nom, au choix du document à générer.
    • 2ème paramètre: Chemin et nom du fichier xsl du format cible, ici le format html.
    • 3ème paramètre: le fichier du contenu à transformer.
    Cette commande doit réussir et générer le fichier document.html dont le contenu est vide. Pour le vérifier, ouvrez ce fichier dans un navigateur web.

    Ajouter un contenu au document.

    Modifier le fichier document.xml de manière à ajouter un titre, un chapitre à un seul paragraphe:
    <?xml version="1.0" encoding="UTF-8"?>
    <book xml:id="doc" xmlns="http://docbook.org/ns/docbook" version="5.0" lang="fr">
      <title>Utiliser DocBook pour créer un document multi-usages</title>
      <chapter xml:id="ch1">
        <title>Introduction</title>
        <section xml:id="ch1se1">
          <title>Qu'est ce que DocBook ?</title>
          <para>
            Un ensemble d'outils XML.
          </para>
        </section>
      </chapter>
    </book>
    
    Maintenant la même commande permet d’obtenir un résultat plus significatif dans document.html: docbook 
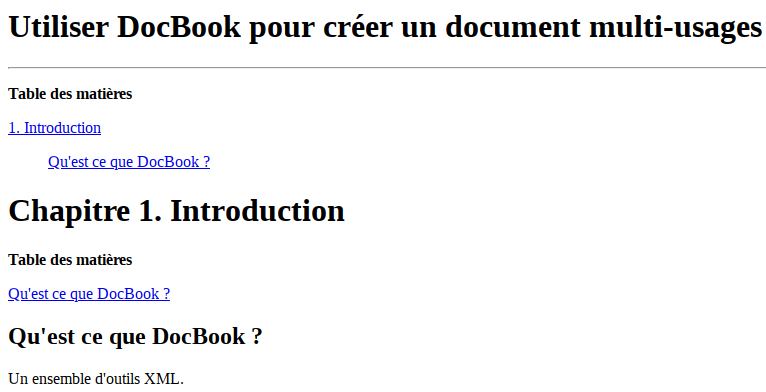
Les éléments ajoutés au document sont dans l’ordre: . Titre du document (<title>xxxx</title>) . Un chapitre (<chapter>xxxx</chapter>) . Au sein du chapitre:

    . Titre du chapitre (<title>xxxx</title>) . Une section qui génère un numéro de paragraphe

    . Au sein de la section: . Titre de la section (<title>xxxx</title>) . Un paragraphe, non numéroté (<para>xxxx</para>)

    Générer le document au format PDF

    Deux commandes successives doivent être exécutées:
    xsltproc -o document.fo /usr/share/xml/docbook/stylesheet/nwalsh/fo/docbook.xsl document.xml
    fop -pdf document.pdf -fo document.fo
    
    La première commande est similaire à celle utilisée pour générer le format html. La seule différence est l’utilisation d’un autre fichier xsl: /usr/share/xml/docbook/stylesheet/nwalsh/fo/docbook.xsl au lieu de /usr/share/xml/docbook/stylesheet/nwalsh/xhtml/docbook.xsl Cette première commande génère un fichier intermédiaire, document.fo, qui sera utilisé par la deuxième commande qui génère le fichier document.pdf]]>

    OpenLDAP password policy – Managing users accounts

    « OpenLDAP password policy » is an overlay that allows you to set up an efficient management of the authentication accounts of people referenced in the OpenLDAP directory. This management concerns in particular the passwords of these persons. This article will show how to configure the OpenLDAP server to activate the« password policy » overlay and implement this management. Prerequisite: The article Adding data to the directory and its prerequisites are read. The OpenLDAP server is installed and the data of the article are entered.

    1. Enable ppolicy schema (OpenLDAP password policy)

    By default, the ppolicy schema is installed: /etc/ldap/schema/ppolicy.ldif, but not enabled. To enable it:
    ldapmodify -x -a -H ldap://localhost -D cn=admin,dc=ldaptuto,dc=net -w admin -f /etc/ldap/schema/ppolicy.ldif
    
    To check the schema loading :
    ldapsearch -x -s one -H ldap://localhost -D cn=admin,dc=ldaptuto,dc=net -w admin -b cn=schema,cn=config cn -LLL
    
    dn: cn={0}core,cn=schema,cn=config
    cn: {0}core
    
    dn: cn={1}cosine,cn=schema,cn=config
    cn: {1}cosine
    
    dn: cn={2}nis,cn=schema,cn=config
    cn: {2}nis
    
    dn: cn={3}inetorgperson,cn=schema,cn=config
    cn: {3}inetorgperson
    
    dn: cn={4}ppolicy,cn=schema,cn=config
    cn: {4}ppolicy
    
    Notice the presence of the ppolicy schema in addition to the four schemas that are enabled by default.

    2. Enable the ppolicy overlay

    Create the LDIF command file: ppolicy-module.ldif
    vi ppolicy-module.ldif
    
    Enter in the editor and save:
    dn: cn=module{0},cn=config
    changeType: modify
    add: olcModuleLoad
    olcModuleLoad: ppolicy
    
    Execute the modify command contained in the file:
    ldapmodify -x -H ldap://localhost -D cn=admin,dc=ldaptuto,dc=net -w admin -f ppolicy-module.ldif
    
    To check the module activation:
    ldapsearch -x -H ldap://localhost -D cn=admin,dc=ldaptuto,dc=net -w admin -b cn=config "(objectClass=olcModuleList)" olcModuleLoad -LLL
    
    dn: cn=module{0},cn=config
    olcModuleLoad: {0}back_mdb
    olcModuleLoad: {1}ppolicy
    
    Notice the presence of the ppolicy module in the list, while default only back_mdb (database management module) is enabled.

    3. Configuring the ppolicy overlay

    Create the LDIF command file: ppolicy-conf.ldif
    vi ppolicy-conf.ldif
    
    Enter in the editor and save:
    dn: olcOverlay=ppolicy,olcDatabase={1}hdb,cn=config
    objectClass: olcPpolicyConfig
    olcOverlay: ppolicy
    olcPPolicyDefault: cn=ppolicy,dc=ldaptuto,dc=net
    olcPPolicyUseLockout: FALSE
    olcPPolicyHashCleartext: TRUE
    
    Add the entry contained in the file:
    ldapmodify -x -a -H ldap://localhost -D cn=admin,dc=ldaptuto,dc=net -w admin -f ppolicy-conf.ldif
    
    To verify that the configuration is actually enabled:
    ldapsearch -x -H ldap://localhost -D cn=admin,dc=ldaptuto,dc=net -w admin -b cn=config "(objectClass=olcPpolicyConfig)" -LLL
    
    dn: olcOverlay={0}ppolicy,olcDatabase={1}hdb,cn=config
    objectClass: olcPPolicyConfig
    olcOverlay: {0}ppolicy
    olcPPolicyDefault: cn=ppolicy,dc=ldaptuto,dc=net
    olcPPolicyHashCleartext: TRUE
    olcPPolicyUseLockout: FALSE
    
    Three configuration settings:
    1. olcPPolicyDefault: Specifies a configuration DN used by default (see next paragraph).
    2. olcPPolicyHashCleartext: Indicates whether passwords should be encrypted systematically. Advise: This setting should be TRUE.
    3. olcPPolicyUseLockout: Indicates whether the error message returned when attempting to connect to a locked account is a message specific to that locked state (TRUE), or a general failed login message (FALSE). FALSE is more secure (no indication to a possible pirate), TRUE is more convenient.

    4. Configure a password policy

    We will configure the entry specified in the olcPPolicyDefault parameter of the ppolicy overlay configuration, i.e. cn=ppolicy,dc=ldaptuto,dc=netTo do this we will create an LDIF file that will allow to add this entry.
    vi ppolicy-defaut.ldif
    
    Enter in the editor and save:
    dn: cn=ppolicy,dc=ldaptuto,dc=net
    objectClass: device
    objectClass: pwdPolicyChecker
    objectClass: pwdPolicy
    cn: ppolicy
    pwdAllowUserChange: TRUE
    pwdAttribute: userPassword
    pwdCheckQuality: 1
    pwdExpireWarning: 600
    pwdFailureCountInterval: 30
    pwdGraceAuthNLimit: 5
    pwdInHistory: 5
    pwdLockout: TRUE
    pwdLockoutDuration: 0
    pwdMaxAge: 0
    pwdMaxFailure: 5
    pwdMinAge: 0
    pwdMinLength: 5
    pwdMustChange: FALSE
    pwdSafeModify: FALSE
    
    Add the entry contained in the file:
    ldapmodify -x -a -H ldap://localhost -D cn=admin,dc=ldaptuto,dc=net -w admin -f ppolicy-defaut.ldif
    
    To verify the result:
    ldapsearch -x -H ldap://localhost -D cn=admin,dc=ldaptuto,dc=net -w admin -b dc=ldaptuto,dc=net "(objectClass=pwdPolicy)" -LLL
    
    16 Settings (all listed attributes) allow you to set up an efficient and effective policy for passwords and user account management. The following command gives you full details about these parameters:
    man slapo-ppolicy
    
    For example, pwdMinLength has been set to 5, which means that a password can not be less than 5 characters in length. Let’s test:
    ldappasswd -x -H ldap://localhost -D uid=durand,ou=people,dc=ldaptuto,dc=net -w durand -s dura
    
    Result: Constraint violation (19)
    Additional info: Password fails quality checking policy
    
    This command allows Alain Durand to log in with his username and password (-D uid=durand,ou=people,dc=ldaptuto,dc=net and -w durand) and change this password with the new value provided (-s dura). The command fails because the new password has only 4 characters.
    ldappasswd -x -H ldap://localhost -D uid=durand,ou=people,dc=ldaptuto,dc=net -w durand -s duran
    
    The command succeeds because the new password has 5 characters. To verify the password modification:
    ldapsearch -x -H ldap://localhost -D uid=durand,ou=people,dc=ldaptuto,dc=net -w durand -b dc=ldaptuto,dc=net
    
    ldap_bind: Invalid credentials (49)
    
    The old password is not accepted and the same command with the new password: duran, should succeed. Another setting: pwdCheckModule controls the quality of the contents of passwords. This setting specifies the file name of a native shared library that ensures this function. Before informing it, it will first be necessary to ensure that this library is present. pqChecker is a library that can be used to control passwords content strength for ppolicy overlay. To use it, you should modify the default password policy setting.
    vi modifpp.ldif
    
    Enter in the editor and save:
    dn: cn=ppolicy,dc=ldaptuto,dc=net
    changeType: modify
    add: pwdCheckModule
    pwdCheckModule: pqchecker.so
    
    Execute the modify command contained in the file:
    ldapmodify -x -a -H ldap://localhost -D cn=admin,dc=ldaptuto,dc=net -w admin -f modifpp.ldif
    
    pqchecker.so is the quality control library for the contents of passwords. By default it is installed at /usr/lib/ldap. It requires by default a password with at least 1 uppercase, 1 lowercase, 1 digit and 1 special character (not alphabetic). Further details about it may be read on http://www.meddeb.net/pqchecker]]>

    Using OpenLDAP to protect access to a website

    Access is only allowed for people that are referenced in the LDAP directory. Prerequisites: The article Adding data to the directory and its prerequisites are read. Le serveur OpenLDAP est installé et les données des exemples de l’article sont entrées.

    1. Installing the Apache web server

    sudo apt-get install apache2
    

    2. Set up a test website

    To make it simple, we will use the default site. Save the entry page of this site:
    sudo cp -p /var/wwww/index.html /var/www/index.html.orig
    
    Create the website main page
    sudo vi /var/www/index.html
    
    And replace the content with:
    <html>
      <header>
        <title>OpenLDAP tutorial</title>
      </header>
      <body>
        <h5>OpenLDAP tutorial website</h5>
      </body>
    </html

    3.Test the operation of the website

    Enter in the address bar of a web browser: http://localhost, then type Enter button. It should show a blank page with the subtitle OpenLDAP tutorial websiteIf this is not the case, check the default site configuration as the installation was probably changed after the web server was installed.
    ls -l /etc/apache2/sites-enabled/
    
    In response to this command we should have at least the line:
    000-default.conf -> ../sites-available/000-default.conf
    
    And the contents of this file must include:
     <VirtualHost desktop:80 >
      ServerName localhost
      DocumentRoot /var/www
      ...
     <VirtualHost>
    
    If this isn’t the case, modiify and restart the server.

    4. Enable and configure the mod-ldap of the Apache web server

    The mod-ldap is an add-in for the web server apache2, it is installed but not enabled by default on Debian systems and compliant. If it is not installed, installationt must be done before any other action.
    sudo a2enmod authnz_ldap
    
    After activation, it should be configured for our OpenLDAP server:
    sudo vi /etc/apache2/mods-enabled/ldap.conf
    
    Modify the contents so that this file contains:
    <Location />
      AuthType Basic
      AuthBasicProvider ldap
      AuthName "Enter login and password"
      AuthLDAPURL ldap://localhost/ou=People,dc=ldaptuto,dc=net?uid?sub?(objectClass=*)
      Require valid-user
    </Location>
    
    And finally restart the web server to enable this new configuration:
    sudo service apache2 restart # Debian 7/ Ubuntu 14 or below
    sudo systemctl restart apache2 # More recents versions
    

    5. Testing the new configuration

    In the address bar of a web browser type : http: // localhost, then type Enter. If all goes well, an authentication is now required to read the page: Notice the parameterized message that appears: “Enter login and password“.  Enter the identifier (uid) of Jean Dupond (dupond) and a false password (different from dupond): access is denied. Enter the correct password (dupond), access should be allowed. If you have enabled the production of OpenLDAP server logs (see Enable OpenLDAP Logging), you can also control the interaction between the two servers by examining the log file.]]>

    OpenLDAP tutorial – Adding data to the directory

    OpenLDAP Tutorial», we will feed the directory with useful data. This will make it possible to actually use the OpenLDAP server. Prerequisite:

    1. Creating a node for people.

    A directory must be organized. In an organization concern, we will first create a node (container) that will receive the directory entries of people. Create an LDIF file for this node:
    vi people.ldif
    
    Enter in the editor and save:
    dn: ou=People,dc=ldaptuto,dc=net
    objectClass: organizationalUnit
    ou: People
    
    • People is a name of your choice.
    • The type of this new entry is organizationalUnit (OU), which is the usual type of container nodes in OpenLDAP.
    • OpenLDAP is case insensitive and does not differentiate between uppercase and lowercase, People or people are equivalent.
    We add this entry to the directory:
    ldapmodify -a -x -H ldap://localhost -D cn=admin,dc=ldaptuto,dc=net -w admin -f people.ldif
    
    -a (to add) after ldapmodify means that you want to add the contents of the file.

    2. Adding people to the directory

    vi dupond.ldif
    
    Enter in the editor and save:
    dn: uid=dupond,ou=People,dc=ldaptuto,dc=net
    objectClass: inetOrgPerson
    givenName: Jean
    sn: Dupond
    cn: Jean Dupond
    uid: dupond
    userPassword: dupond
    
    We add this entry to the directory:
    ldapmodify -a -x -H ldap://localhost -D cn=admin,dc=ldaptuto,dc=net -w admin -f dupond.ldif
    
    And we check this addition:
    ldapsearch -x -H ldap://localhost -D cn=admin,dc=ldaptuto,dc=net -w admin -b ou=People,dc=ldaptuto,dc=net
    
    Notice that the password does not appear in plain text. however it is not encrypted.

    3. Directory use

    Now let’s look at what happens if Jean Dupond tries to connect to the directory and see the people referenced (among others himself).
    ldapsearch -x -H ldap://localhost -D uid=dupond,ou=people,dc=ldaptuto,dc=net -w dupond -b ou=people,dc=ldaptuto,dc=net -LLL
    ldap_bind: Invalid credentials (49)
    
    • -D: DN of the user who authenticates, the request uses the read rights of this user.
    • -w: The user password.
    The result is an error message which means that the authenticationhas failed. However the data sent is correct (DN and password). The reason is an inadequate access right for authentication. We cannot address this sensitive and complex topic of rights here. We will just add a configuration that will allow directory users to authenticate.
    vi acces.ldif
    
    Enter in the editor and save:
    dn: olcDatabase={1}mdb,cn=config
    changeType: modify
    add: olcAccess
    olcAccess: to * by users read by anonymous auth by * none
    
    This command adds authentication (by anonymous auth) and read permission to all people in the directory (by users read). Of course, it is not advisable to use such a configuration in real use. It is used here only for simple demonstration. We add this setting to the directory:
    ldapmodify -x -H ldap://localhost -D cn=admin,dc=ldaptuto,dc=net -w admin -f acces.ldif
    
    Now, a query to read the data of the people in the directory by Jean Dupond (same as the previous one) makes it possible to display them.
    ldapsearch -x -H ldap://localhost -D uid=dupond,ou=people,dc=ldaptuto,dc=net -w dupond -b ou=people,dc=ldaptuto,dc=net -LLL
    dn: ou=People,dc=ldaptuto,dc=net
    objectClass: organizationalUnit
    ou: People
    
    dn: uid=dupond,ou=People,dc=ldaptuto,dc=net
    objectClass: inetOrgPerson
    givenName: Jean
    sn: Dupond
    cn: Jean Dupond
    uid: dupond
    userPassword:: e1NTSEF9Umk1d0QrWEtmNHRrSHBOelBEMkdqU3NNSUhtRmtNU28=
    
    Finally, the directory served by OpenLDAP allows Jean Dupond, who is referenced there, to authenticate and read all the data it contains. As an exercise you can add another person to the directory: Alain Durand. After that the contents of this directory will have this structure:
    dc=ldaptuto,dc=net
    ├── cn=admin,dc=ldaptuto,dc=net
    └── ou=People,dc=ldaptuto,dc=net
        ├── uid=dupond,ou=People,dc=ldaptuto,dc=net
        └── uid=durand,ou=People,dc=ldaptuto,dc=net
    
    ]]>

    Openldap tutorial – organization and data types

    we’ll see how this directory server organizes its content. This is a necessary prerequisite to be able to put data to it. Once data is entered, the server will be ready for use. The main uses are: the authentication of users on the computer systems and the synchronization of data with these systems (e.g. email servers). The advantage of using LDAP servers for these functions is that this protocol has become a wide used standard. It’s supported by the most computer systems and applications that have this need. A coming article will deal with data feeding. Prerequisites:

    1. Data organization in an OpenLDAP server

    In an OpenLDAP server, the data is organized like a treeThere is the root of the tree: the DIT (Directory information tree), the trunk of the tree and moving after the trunk, we meet:
    • Nodes: Special type data that has the ability to contain other data.
    • Leaves: the data that can be of different types.
    We can compare, by analogy, this organization to that of a file system on a computer disk. Here is the representation that would be obtained from the /etc/resolvconf folder by the command:
    sudo tree /etc/resolvconf
    
    – In blue, the nodes or folders in the file system. – In light blue and green, the data or files in the file system. To unambiguously designate the dnscache file for example, we use the full path (full qualified name – FQN): /etc/resolvconf/update.d/dnscache. This is necessary because there may be another file, which has the same name, somewhere else on the disk. For an LDAP directory the equivalent of the FQN is the DN (distinguished name) and it is the complete path from the root (ie the DIT).

    2. Data types in an OpenLDAP server

    There are a very large number of data types that can be used by the OpenLDAP server. In addition, these data types are scalable and constantly evolving. In practice it is advisable to choose a limited set of these types of data according to actual needs. To do this we must declare the schemas to be embedded in the configuration of the server. A scema is a description of the data types (metadata). This command lists the schemas embedded by the server:
    ldapsearch -x -H ldap://localhost -s one -D cn=admin,dc=ldaptuto,dc=net -y pwdAdmin -b cn=schema,cn=config cn -LLL
    dn: cn={0}core,cn=schema,cn=config
    cn: {0}core
    
    dn: cn={1}cosine,cn=schema,cn=config
    cn: {1}cosine
    
    dn: cn={2}nis,cn=schema,cn=config
    cn: {2}nis
    
    dn: cn={3}inetorgperson,cn=schema,cn=config
    cn: {3}inetorgperson
    
    The result is the one obtained just after the installation of an OpenLDAP server. These are the four embedded schema by default. They are sufficient for most basic uses of an LDAP directory.

    3. The default contents of the OpenLDAP server

    To get the full and actual contents of an OpenLDAP directory, you must run a search query in connected mode with the server administrator account (rootDN). This is the only account that is never subject to any access restrictions.
    ldapsearch -x -H ldap://localhost -D cn=admin,dc=ldaptuto,dc=net -y pwdAdmin -b dc=ldaptuto,dc=net -LLL
    dn: dc=ldaptuto,dc=net
    objectClass: top
    objectClass: dcObject
    objectClass: organization
    o: OpenLDAP tutorial
    dc: ldaptuto
    
    dn: cn=admin,dc=ldaptuto,dc=net
    objectClass: simpleSecurityObject
    objectClass: organizationalRole
    cn: admin
    description: LDAP administrator
    userPassword:: e1NTSEF9RzlwcjRUdkRJajlWOWpqYjFzMTJkczhaaDBrY2pzOXA=
    
    The result is the one obtained just after installing an OpenLDAP server. Notice the values entered during the installation (or reconfiguration).
    • cn=admin: the server administrator identifier.
    • o=OpenLDAP tutorial: The organization label.
    • dc=ldaptuto,dc=net: the DIT (domain name).
    • userPassword: administrator password (encrypted).
    There are only two entries in the directory tree: dc=ldaptuto,dc=net └── cn=admin,dc=ldaptuto,dc=net The values of the objectClass attribute determines the nature (or type) of the entry.
    • dc=ldaptuto, dc=net: has dcObject type, it is the special type that determines the root or DIT of the directory. This entry is the container for all data in this directory.
    • cn=admin,dc=ldaptuto,dc=net: has simpleSecurityObject type, data that represents an authentication account. Mainly contains the password of this account.
    In upcoming articles we will see other types and will feed more the directory.]]>

    OpenLDAP tutorial – Remotly configuration management by the administrator

    Prerequisites: OpenlDAP is installed and pre configured on a Debian, Ubuntu or compliant system. cf. previous articles about OpenLDAP.

    1. Avoid entering the administrator password at each command

    Store the super administrator password (“admin” in the sample) in a file:
    echo -n "admin" > ~/pwdAdmin
    chmod 600 ~/pwdAdmin
    
    This creates the «pwdAdmin» file that contains the super administrator password. To test its use:
    ldapsearch -x -H ldap://localhost -D cn=admin,dc=ldaptuto,dc=net -y ~/pwdAdmin -b dc=ldaptuto,dc=net
    
    The advantage of using the server administrator account instead of the system administrator account (root) is that you can execute remote commands. Those commands may be launched from a desktop machine. in this case replace localhost with the DNS name of the remote machine or its IP address.

    2. Super administrator access rights to server configuration

    The configuration of the OpenLDAP server is located in the database under the DIT cn = config. It’s the equivalent of the configuration file slapd.conf content in the old-style work. By default the super administrator cannot access this configuration:
    ldapsearch -x -H ldap://localhost -D cn=admin,dc=ldaptuto,dc=net -y ~/pwdAdmin -b cn=config
    
    The result of this command is empty. We will use the «root» system user’s extended rights to give the OpenLDAP server super administrator access to the configuration data. Create ths LDIF file «acces-admin.ldif» who has the content:
    dn: olcDatabase={0}config,cn=config
    changeType: modify
    add: olcAccess
    olcAccess: to * by dn.exact=cn=admin,dc=ldaptuto,dc=net manage by * break
    
    Then, execute the modify command on the server:
    sudo ldapmodify -Y external -H ldapi:/// -f acces-admin.ldif
    
    This gives read and write rights on all configuration data of the server to the administrator (cn=admin,dc=ldaptuto,dc=net). It can easily be verified by running the previous query on this data and did not return any results.]]>

    Enable the production of Openldap Log file

    Goal: In this 3rd part of the «OpenLDAP tutorial», we will enable the production of Log. To do that we must change default configuration of the server. The production of OpenLDAP log is very important for supervision and the proper use of this server. Prerequisite: The OpenLDAP server is installed with its default configuration. The installation has been done on GNU/Linux Debian, Ubuntu OS or compliant system. cf. part 1 and part 2 of this «OpenLDAP tutorial» series.

    1. Enable the production of server Logs

    sudo ldapsearch -Y external -H ldapi:/// -b cn=config "(objectClass=olcGlobal)" olcLogLevel -LLL > slapdlog.ldif
    
    This command creates the slapdlog.ldif file whose content is the result of the LDAP query executed by ldapsearch utility:
    dn: cn=config
    olcLogLevel: none
    
    The first line contains the DN (distinguished name) who is the unique identifier of the entry. The second line contains the unique attribute requested by the query with value: none. The production of log files is disabled by default. Modify that file so that its content becomes:
    dn: cn=config
    changeType: modify
    replace: olcLogLevel
    olcLogLevel: stats
    
    Now, this LDIF (Lightweight data interchange format) contains a modify command: the second line says we want to change the entry, the third line indicates that it is a replacement of the content of the olcLogLevel attribute and the fourth shows the new value of this attribute. stats level allow generate logs of connections, operations and results. This is perfect for daily monitoring. To run the command file on the server, we use:
    sudo ldapmodify -Y external -H ldapi:/// -f slapdlog.ldif
    
    If we get the message: modifying entry “cn=config”, the operation was successful. To check the result:
    sudo ldapsearch -Y external -H ldapi:/// -b cn=config "(objectClass=olcGlobal)" olcLogLevel
    
    This new setting is immediately considered by the server and no reboot is required. The server sends the produced Logs, to the system log management mechanism. This is rsyslog for recent versions of Debian / Ubuntu OS.

    2. Consideration of OpenLDAP log in rsyslog

    Create a configuration file in the folder /etc/rsyslog.d/choose any name10-slapd.conf for example. The number in the name classifies files in this folder. This file contains those settings:
    $template slapdtmpl,"[%$DAY%-%$MONTH%-%$YEAR% %timegenerated:12:19:date-rfc3339%] %app-name% %syslogseverity-text% %msg%\n"
    local4.*    /var/log/slapd.log;slapdtmpl
    
    The chosen name slapdtmpl, refers to a presentation format of the contents of the log file. For details on the template creations for rsyslog consult the manual:
    man rsyslog.conf
    
    See, in particular the section TEMPLATES. Finally you must restart rsyslog for the new settings to take effect.
    service rsyslog restart
    

    3. Test this functionality of the OpenLDAP server

    Start a query and view the contents of the file /var/log/slapd.log :
    sudo ldapsearch -Y external -H ldapi:/// -b dc=ldaptuto,dc=net
    sudo cat /var/log/slapd.log
    
    You should have a fairly significant content that show the work done by the OpenLDAP server to produce the query result..]]>

    OpenLDAP tutorial (2) – Modify the default settings

    Goal: This«OpenLDAP tutorial» aims to show how to improve the basic server configuration viewed in OpenLDAP tutorial – Installation and basic configuration post. This reconfiguration allows to customize settings made by default in the installation procedure. This is a further step to prepare th server use in a real environment. Prerequisite: The OpenLDAP server is installed with its default configuration. The installation is  done on a host with Debian / Ubuntu OS or compliant. This reconfiguration must be made before filling the directory server with data. The reason is this will reset the database and set its contents to empty. This reconfiguration is done with the command:

    sudo dpkg-reconfigure slapd
    
    Following this a series of screens appear and asks you to enter settings or make choices.

    Reconfiguring OpenLDAP – step 1

    openldap tutorial openldap ubuntuChoose <No> to start the reconfiguration.

    Reconfiguring OpenLDAP – step 2

    openldap tutorial By default, the domain name configured for the host machine is taken. Enter the domain name, this sets the DIT in the directory. In this example: dc=ldaptuto,dc=net

    Reconfiguring OpenLDAP – step 3

    openldap tutorial openldap ubuntuEnter the name of the organization, a label attached to the DIT in the directory. For information only.

    Reconfiguring OpenLDAP – step 4

    openldap tutorial openldap ubuntuPassword of the directory administrator who is cn=admin,dc=ldaptuto,dc=net. The administrator has all the rights and it is not subject to any restrictions set.

    Reconfiguring OpenLDAP – step 5

    openldap tutorial The Database type to use. OpenLDAP can work with many types of databases like BDB, HDB and MDB, which are proposed by the installation procedure. MDB is the recommended database. It is more compact and powerful than HDB and BDB. MDB works without any special configuration and allows you to rename a sub-set of the directory (any node) just like HDB.

    Reconfiguring OpenLDAP – step 6

    openldap tutorial openldap ubuntuBehavior when uninstalling and then purge the package slapd. Choose whether the data files to be deleted or not (<No> is more cautious, <Yes> is more efficient).

    Reconfiguring OpenLDAP – step 7

    openldap tutorial Choose <Yes>. The data files will moved from /var/lib/ldap to /var/backup.

    Reconfiguring OpenLDAP – step 8 (if it apears)

    openldap tutorial openldap ubuntuChoose <No>, unless there is a good reason (eg maintain compatibility with old system). Following this step, the directory server is reset and restarted.

    Check the new setting

    sudo ldapsearch -Y external -H ldapi:///  -b dc=ldaptuto,dc=net ↵
    
    SASL/EXTERNAL authentication started
    SASL username: gidNumber=0+uidNumber=0,cn=peercred,cn=external,cn=auth
    SASL SSF: 0
    # extended LDIF
    #
    # LDAPv3
    # base <dc=ldaptuto,dc=net> with scope subtree
    # filter: (objectclass=*)
    # requesting: ALL
    #
    
    # ldaptuto.net
    dn: dc=ldaptuto,dc=net
    objectClass: top
    objectClass: dcObject
    objectClass: organization
    o: OpenLDAP tutorial
    dc: ldaptuto
    
    # admin, ldaptuto.net
    dn: cn=admin,dc=ldaptuto,dc=net
    objectClass: simpleSecurityObject
    objectClass: organizationalRole
    cn: admin
    description: LDAP administrator
    
    # search result
    search: 2
    result: 0 Success
    
    # numResponses: 3
    # numEntries: 2
    
    Noice the new DIT dc=ldaptuto,dc=net and its label o: OpenLDAP tutorial]]>

    OpenLDAP tutorial – Installation

    First article in a series “OpenLDAP tutorial”.The presentation is done step by step by showing all the details necessary for the final operation. The exposed installation has a minimum configuration for correct operation. Other articles will follow to improve the installation on different aspects. It is advisable to follow this series of posts in order:

    1. This article, installation and basic configuration.
    2. Modify the default settings
    3. Enable the production of Openldap Log file
    4. Remotly configuration management by the administrator
    5. Organization and data types
    6. Adding data to the directory
    7. Using OpenLDAP to protect access to a website
    8. OpenLDAP password policy – Managing users accounts
    Prerequisite: Nothing about the OpenLDAP server.

    OpenLDAP tutorial, step 1: Properly configure the host Debian / Ubuntu

    The server installation procedure systematically sets up a database.  The DIT (like an instance in relational databases) is selected based on the domain name of the host machine.
    hostname -f
    
    This command returns the full qualified name of the machine. Example: desktop.meddeb.net. In this case the database will have as DIT: dc=meddeb,dc=net (the right part of the name from the 1st dot met). If the configuration does not suit you, it should be modified (files /etc/hostname and /etc/hosts).

    OpenLDAP tutorial, step 2: Install the OpenLDAP server on Debian / Ubuntu

    sudo apt-get purge slapd
    sudo apt-get install slapd
    
    The installation process will start and request the password of the server administrator. openldap tutorial, openldap ubuntu, openldap debianIn addition to the executable binary files, it is installed the files in folders:
    • /usr/lib/ldap/ : OpenLDAP overlay libraries, binary native files.
    • /etc/ldap/schema/ : OpenLDAP schemas availables, text files.
    • /etc/ldap/slap.d/ : Dynamic configuration, text files.
    • /var/lib/ldap/ : Installed database files.
    • /var/run/slapd/ : Run settings, text files.

    OpenLDAP tutorial, step 3: Install the OpenLDAP client utilities

    sudo apt-get install ldap-utils
    
    This installs the Openldap client utilities , including the ldapsearch query tool. The configuration file of those tools, /etc/ldap/ldap.conf, may be very useful. It allows to set defaults queries parameters. This simplifies the interaction with the server. a typical contents of this file is:
    BASE   dc=meddeb,dc=net
    URI    ldap://localhost
    SIZELIMIT      12
    TIMELIMIT      15
    DEREF          never
    # TLS certificates (needed for GnuTLS)
    TLS_CACERT      /etc/ssl/certs/ca-certificates.crt
    

    OpenLDAP tutorial, step 4: Check the installation.

    slapd -V ↵
    @(#) $OpenLDAP: slapd  (Ubuntu) (Mar 17 2014 21:20:08) $
            buildd@aatxe:/build/buildd/openldap-2.4.31/debian/build/servers/slap
    In this sample, the installed server version is 2.4.31
    ldapsearch -Y external  -H ldapi:/// -b cn=config "(objectClass=olcGlobal)" -LLL ↵
    SASL/EXTERNAL authentication started
    SASL username: gidNumber=0+uidNumber=0,cn=peercred,cn=external,cn=auth
    SASL SSF: 0
    dn: cn=config
    objectClass: olcGlobal
    cn: config
    olcArgsFile: /var/run/slapd/slapd.args
    olcLogLevel: none
    olcPidFile: /var/run/slapd/slapd.pid
    olcToolThreads: 1
    
    This gives the global part of the configuration. This is a default setting. Notice the runtime parameters folder: /var/run/slapd/. Notice, also, the olcLogLevel parameter set to none. This value must be modified for better operation.
    sudo ldapsearch -Y external  -H ldapi:/// -b dc=meddeb,dc=net -LLL ↵
    
    ASL/EXTERNAL authentication started
    SASL username: gidNumber=0+uidNumber=0,cn=peercred,cn=external,cn=auth
    SASL SSF: 0
    dn: dc=meddeb,dc=net
    objectClass: top
    objectClass: dcObject
    objectClass: organization
    o: meddeb.net
    dc: meddeb
    
    dn: cn=admin,dc=meddeb,dc=net
    objectClass: simpleSecurityObject
    objectClass: organizationalRole
    cn: admin
    description: LDAP administrator
    
    This gives the only two entries created by default in the directory:
    • dc=meddeb,dc=net, who is the DIT of the directory.
    • cn=admin,dc=meddeb,dc=net, who is the administrator of the directory and his password given during installation.
    ]]>

    Tuto Git – Utiliser Git avec eclipse: publier, tagger, visualiser

    Objectif: Publier un projet sur un serveur distant avec Git sous eclipse. Pouvoir poser des tags et consulter l’historique et les paramètres du projet avec cet outil. Pré-requis: Fonctionnement de Git et l’article précédent à propos de l’utilisation de Git avec eclipse.

    1. Créer le dépôt du projet calcul sur le serveur.

    Conformément à l’environnement de simulation mis en place dans cette serie d’articles sur Git, on crée le dépôt du projet “calcul” du côté serveur. Cette étape ne concerne pas l’utilisateur de Git mais plutôt un administrateur système. D’un autre côté, dans un environnement réel elle s’effectue sur une machine serveur distante, le plus souvent accessible via HTTP par les utilisateurs.
    cd /serveurgit
    git init --bare calcul.git
    
    Ceci créee le dépôt Git du projet dans le dossier /serveurgit/calcul.git/. Cette mise en place nous permettra de nous servir de ce dépôt pour simuler la publication du projet sur un serveur distant.

    2. Publier le projet dans le dépôt du serveur.

    Jusqu’à présent les “commit” effectués (cf. article “Git avec eclipse“), l’ont été dans le dépôt local sur la machine du développeur. Pour partger ce projet avec d’autres développeurs, il convient de le publier dans le dépôt distant (remote) du serveur. Pour le faire avec Git sous eclipse il faut sélectionner le projet dans l’explorateur (volet par défaut situé à gauche) et ensuite utiliser le menu contextuel (Click avec le bouton droit de la souris). Tuto GitUtiliser le menu: Team / Push branch master. Ceci conduit à l’assistant de publication: Tuto GitLe dossier qui simule le dépôt du serveur étant local en réalité, nous utilisons le bouton “Local File..“. Il nous permettra de sélectionner facilement l’emplacement du dépôt à utiliser, c’est à dire “/serveurgit/calcul.git“. Ceci alimentera les champs “URI” et “Repository path” sans saisie. Le champ “Remote name” doit être gardé à sa valeur par défaut: “origin“, c’est une convention de Git de nommer le dépôt distant ainsi et il vaut mieux la garder. A ce sujet, il convient de noter qu’en réalité le serveur distant est accessible généralement par le protocole HTTP (tel que https://github.com/ameddeb/japptools.git) ou le protocole propre à git (tel que git://github.com/ameddeb/japptools.git). Le paramétrage utilisé est dicté par la situation de simulation uniquement. Après la saisie, le bouton “Next” permet de passer à l’étape suivante. Tuto GitLes valeurs par défaut sont convenables, on les garde et on utilise le bouton “Next” pour passer à l’étape suivante. Tuto GitOn utilise le bouton “Finish” pour finaliser la publication. A ce stade le dernier commit du projet est publié sur le serveur.

    3. Poser un Tag dans le projet.

    Avant de poser un Tag, qui constitue généralement un marquage pour une version du projet, nous allons faire évoluer le fonctionnement. Pour cela on effectue la modification suivante dans le fichier App.java:
    public static void main( String[] args )
    {
          System.out.println( "125 x 3 = " + 125*3 );
    }
    
    On remplace simplement l’affichage de “Hello world!” par le calcul de la multiplication. Ensuite, après avoir exécuté avec succès le nouveau code et surtout pas avant, comme c’est malheureusement la cas souvent dans la réalité de tous les jours, on valide (commit) la modification dans le dépôt local. Tuto GitOn utilise le bouton “Commit” après avoir indexé le projet et saisie le message. Suite à cela on va ajouter un calcul d’addition au projet:
       System.out.println( "450 + 343 = " + (450 +343) );
    
    De la même manière que pour la multiplication, on valide (commit) également cette nouvelle modification en adaptant le message. Maintenant que le projet est suffisamment évolué, on se propose de poser un Tag de version “v1.0“. Pour cela on utilise le menu contextuel du projet calcul: Tuto GitTeam / Advanced / Tag.., Ce menu donne accès à l’écran de création de Tag: Tuto GitDans cet écran, on saisie le Tag (Tag name), le message qui l’accompagne (Tag message) et ensuite on utilise le bouton “Create Tag” pour le créer effectivement. Remarquer toutefois la présence du bouton “Create Tag and Start Push” qui permet de créer le Tag et de publier sur le serveur distant en même temps.

    4. Visualiser les données du dépôt.

    On peut visualiser le paramétrage du dépôt en utilisant le menu destiné à cet effet: Tuto GitTeam / Show in Repositories View, Ce menu permet d’accéder aux informations qui s’affichent dans le volet bas de l’espace de travail d’eclipse: Tuto GitOn remarquera notamment la possibilité de visualiser les branches, les Tags et le paramétrage des dépôts distants (perce qu’on peut en avoir plusieurs mais cela est autre sujet). Par ailleurs, on peut visualiser également l’historique du projet, équivalent de “commit log“, en utilisant le menu au dessus du précédent: Team / Show In History. Cela donne l’affichage de l’historique: Tuto Git]]>