Archives de catégorie : English

Articles en anglais

OpenLDAP password policy – Managing users accounts

« OpenLDAP password policy » is an overlay that allows you to set up an efficient management of the authentication accounts of people referenced in the OpenLDAP directory. This management concerns in particular the passwords of these persons. This article will show how to configure the OpenLDAP server to activate the« password policy » overlay and implement this management.

Prerequisite: The article Adding data to the directory and its prerequisites are read. The OpenLDAP server is installed and the data of the article are entered.

1. Enable ppolicy schema (OpenLDAP password policy)

By default, the ppolicy schema is installed: /etc/ldap/schema/ppolicy.ldif, but not enabled. To enable it:

ldapmodify -x -a -H ldap://localhost -D cn=admin,dc=ldaptuto,dc=net -w admin -f /etc/ldap/schema/ppolicy.ldif

To check the schema loading :

ldapsearch -x -s one -H ldap://localhost -D cn=admin,dc=ldaptuto,dc=net -w admin -b cn=schema,cn=config cn -LLL

dn: cn={0}core,cn=schema,cn=config
cn: {0}core

dn: cn={1}cosine,cn=schema,cn=config
cn: {1}cosine

dn: cn={2}nis,cn=schema,cn=config
cn: {2}nis

dn: cn={3}inetorgperson,cn=schema,cn=config
cn: {3}inetorgperson

dn: cn={4}ppolicy,cn=schema,cn=config
cn: {4}ppolicy

Notice the presence of the ppolicy schema in addition to the four schemas that are enabled by default.

2. Enable the ppolicy overlay

Create the LDIF command file: ppolicy-module.ldif

vi ppolicy-module.ldif

Enter in the editor and save:

dn: cn=module{0},cn=config
changeType: modify
add: olcModuleLoad
olcModuleLoad: ppolicy

Execute the modify command contained in the file:

ldapmodify -x -H ldap://localhost -D cn=admin,dc=ldaptuto,dc=net -w admin -f ppolicy-module.ldif

To check the module activation:

ldapsearch -x -H ldap://localhost -D cn=admin,dc=ldaptuto,dc=net -w admin -b cn=config "(objectClass=olcModuleList)" olcModuleLoad -LLL

dn: cn=module{0},cn=config
olcModuleLoad: {0}back_mdb
olcModuleLoad: {1}ppolicy

Notice the presence of the ppolicy module in the list, while default only back_mdb (database management module) is enabled.

3. Configuring the ppolicy overlay

Create the LDIF command file: ppolicy-conf.ldif

vi ppolicy-conf.ldif

Enter in the editor and save:

dn: olcOverlay=ppolicy,olcDatabase={1}hdb,cn=config
objectClass: olcPpolicyConfig
olcOverlay: ppolicy
olcPPolicyDefault: cn=ppolicy,dc=ldaptuto,dc=net
olcPPolicyUseLockout: FALSE
olcPPolicyHashCleartext: TRUE

Add the entry contained in the file:

ldapmodify -x -a -H ldap://localhost -D cn=admin,dc=ldaptuto,dc=net -w admin -f ppolicy-conf.ldif

To verify that the configuration is actually enabled:

ldapsearch -x -H ldap://localhost -D cn=admin,dc=ldaptuto,dc=net -w admin -b cn=config "(objectClass=olcPpolicyConfig)" -LLL

dn: olcOverlay={0}ppolicy,olcDatabase={1}hdb,cn=config
objectClass: olcPPolicyConfig
olcOverlay: {0}ppolicy
olcPPolicyDefault: cn=ppolicy,dc=ldaptuto,dc=net
olcPPolicyHashCleartext: TRUE
olcPPolicyUseLockout: FALSE

Three configuration settings:

  1. olcPPolicyDefault: Specifies a configuration DN used by default (see next paragraph).
  2. olcPPolicyHashCleartext: Indicates whether passwords should be encrypted systematically. Advise: This setting should be TRUE.
  3. olcPPolicyUseLockout: Indicates whether the error message returned when attempting to connect to a locked account is a message specific to that locked state (TRUE), or a general failed login message (FALSE). FALSE is more secure (no indication to a possible pirate), TRUE is more convenient.

4. Configure a password policy

We will configure the entry specified in the olcPPolicyDefault parameter of the ppolicy overlay configuration, i.e. cn=ppolicy,dc=ldaptuto,dc=netTo do this we will create an LDIF file that will allow to add this entry.

vi ppolicy-defaut.ldif

Enter in the editor and save:

dn: cn=ppolicy,dc=ldaptuto,dc=net
objectClass: device
objectClass: pwdPolicyChecker
objectClass: pwdPolicy
cn: ppolicy
pwdAllowUserChange: TRUE
pwdAttribute: userPassword
pwdCheckQuality: 1
pwdExpireWarning: 600
pwdFailureCountInterval: 30
pwdGraceAuthNLimit: 5
pwdInHistory: 5
pwdLockout: TRUE
pwdLockoutDuration: 0
pwdMaxAge: 0
pwdMaxFailure: 5
pwdMinAge: 0
pwdMinLength: 5
pwdMustChange: FALSE
pwdSafeModify: FALSE

Add the entry contained in the file:

ldapmodify -x -a -H ldap://localhost -D cn=admin,dc=ldaptuto,dc=net -w admin -f ppolicy-defaut.ldif

To verify the result:

ldapsearch -x -H ldap://localhost -D cn=admin,dc=ldaptuto,dc=net -w admin -b dc=ldaptuto,dc=net "(objectClass=pwdPolicy)" -LLL

16 Settings (all listed attributes) allow you to set up an efficient and effective policy for passwords and user account management. The following command gives you full details about these parameters:

man slapo-ppolicy

For example, pwdMinLength has been set to 5, which means that a password can not be less than 5 characters in length. Let’s test:

ldappasswd -x -H ldap://localhost -D uid=durand,ou=people,dc=ldaptuto,dc=net -w durand -s dura

Result: Constraint violation (19)
Additional info: Password fails quality checking policy

This command allows Alain Durand to log in with his username and password (-D uid=durand,ou=people,dc=ldaptuto,dc=net and -w durand) and change this password with the new value provided (-s dura). The command fails because the new password has only 4 characters.

ldappasswd -x -H ldap://localhost -D uid=durand,ou=people,dc=ldaptuto,dc=net -w durand -s duran

The command succeeds because the new password has 5 characters. To verify the password modification:

ldapsearch -x -H ldap://localhost -D uid=durand,ou=people,dc=ldaptuto,dc=net -w durand -b dc=ldaptuto,dc=net

ldap_bind: Invalid credentials (49)

The old password is not accepted and the same command with the new password: duran, should succeed.

Another setting: pwdCheckModule controls the quality of the contents of passwords. This setting specifies the file name of a native shared library that ensures this function. Before informing it, it will first be necessary to ensure that this library is present. pqChecker is a library that can be used to control passwords content strength for ppolicy overlay. To use it, you should modify the default password policy setting.

vi modifpp.ldif

Enter in the editor and save:

dn: cn=ppolicy,dc=ldaptuto,dc=net
changeType: modify
add: pwdCheckModule
pwdCheckModule: pqchecker.so

Execute the modify command contained in the file:

ldapmodify -x -a -H ldap://localhost -D cn=admin,dc=ldaptuto,dc=net -w admin -f modifpp.ldif

pqchecker.so is the quality control library for the contents of passwords. By default it is installed at /usr/lib/ldap. It requires by default a password with at least 1 uppercase, 1 lowercase, 1 digit and 1 special character (not alphabetic). Further details about it may be read on http://www.meddeb.net/pqchecker

Using OpenLDAP to protect access to a website

In this article we will see how to use openldap server to protect access to a website. Protecting access mean allowing only a restricted set of people to read the content of this website. More concretely, each request for access to the website will be asked to enter an identifier and a password. Access is only allowed for people that are referenced in the LDAP directory.

Prerequisites: The article Adding data to the directory and its prerequisites are read. Le serveur OpenLDAP est installé et les données des exemples de l’article sont entrées.

1. Installing the Apache web server

sudo apt-get install apache2

2. Set up a test website

To make it simple, we will use the default site. Save the entry page of this site:

sudo cp -p /var/wwww/index.html /var/www/index.html.orig

Create the website main page

sudo vi /var/www/index.html

And replace the content with:

<html>
  <header>
    <title>OpenLDAP tutorial</title>
  </header>
  <body>
    <h5>OpenLDAP tutorial website</h5>
  </body>
</html

3.Test the operation of the website

Enter in the address bar of a web browser: http://localhost, then type Enter button.

It should show a blank page with the subtitle OpenLDAP tutorial websiteIf this is not the case, check the default site configuration as the installation was probably changed after the web server was installed.

ls -l /etc/apache2/sites-enabled/

In response to this command we should have at least the line:

000-default.conf -> ../sites-available/000-default.conf

And the contents of this file must include:

 <VirtualHost desktop:80 >
  ServerName localhost
  DocumentRoot /var/www
  ...
 <VirtualHost>

If this isn’t the case, modiify and restart the server.

4. Enable and configure the mod-ldap of the Apache web server

The mod-ldap is an add-in for the web server apache2, it is installed but not enabled by default on Debian systems and compliant. If it is not installed, installationt must be done before any other action.

sudo a2enmod authnz_ldap

After activation, it should be configured for our OpenLDAP server:

sudo vi /etc/apache2/mods-enabled/ldap.conf

Modify the contents so that this file contains:

<Location />
  AuthType Basic
  AuthBasicProvider ldap
  AuthName "Enter login and password"
  AuthLDAPURL ldap://localhost/ou=People,dc=ldaptuto,dc=net?uid?sub?(objectClass=*)
  Require valid-user
</Location>

And finally restart the web server to enable this new configuration:

sudo service apache2 restart # Debian 7/ Ubuntu 14 or below
sudo systemctl restart apache2 # More recents versions

5. Testing the new configuration

In the address bar of a web browser type : http: // localhost, then type Enter. If all goes well, an authentication is now required to read the page:

Notice the parameterized message that appears: « Enter login and password« .  Enter the identifier (uid) of Jean Dupond (dupond) and a false password (different from dupond): access is denied.

Enter the correct password (dupond), access should be allowed.

If you have enabled the production of OpenLDAP server logs (see Enable OpenLDAP Logging), you can also control the interaction between the two servers by examining the log file.

OpenLDAP tutorial – Adding data to the directory

In this 6th article of the series «OpenLDAP Tutorial», we will feed the directory with useful data. This will make it possible to actually use the OpenLDAP server.

Prerequisite:

1. Creating a node for people.

A directory must be organized. In an organization concern, we will first create a node (container) that will receive the directory entries of people.

Create an LDIF file for this node:

vi people.ldif

Enter in the editor and save:

dn: ou=People,dc=ldaptuto,dc=net
objectClass: organizationalUnit
ou: People
  • People is a name of your choice.
  • The type of this new entry is organizationalUnit (OU), which is the usual type of container nodes in OpenLDAP.
  • OpenLDAP is case insensitive and does not differentiate between uppercase and lowercase, People or people are equivalent.

We add this entry to the directory:

ldapmodify -a -x -H ldap://localhost -D cn=admin,dc=ldaptuto,dc=net -w admin -f people.ldif

-a (to add) after ldapmodify means that you want to add the contents of the file.

2. Adding people to the directory

vi dupond.ldif

Enter in the editor and save:

dn: uid=dupond,ou=People,dc=ldaptuto,dc=net
objectClass: inetOrgPerson
givenName: Jean
sn: Dupond
cn: Jean Dupond
uid: dupond
userPassword: dupond

We add this entry to the directory:

ldapmodify -a -x -H ldap://localhost -D cn=admin,dc=ldaptuto,dc=net -w admin -f dupond.ldif

And we check this addition:

ldapsearch -x -H ldap://localhost -D cn=admin,dc=ldaptuto,dc=net -w admin -b ou=People,dc=ldaptuto,dc=net

Notice that the password does not appear in plain text. however it is not encrypted.

3. Directory use

Now let’s look at what happens if Jean Dupond tries to connect to the directory and see the people referenced (among others himself).

ldapsearch -x -H ldap://localhost -D uid=dupond,ou=people,dc=ldaptuto,dc=net -w dupond -b ou=people,dc=ldaptuto,dc=net -LLL
ldap_bind: Invalid credentials (49)
  • -D: DN of the user who authenticates, the request uses the read rights of this user.
  • -w: The user password.

The result is an error message which means that the authenticationhas failed. However the data sent is correct (DN and password). The reason is an inadequate access right for authentication. We cannot address this sensitive and complex topic of rights here. We will just add a configuration that will allow directory users to authenticate.

vi acces.ldif

Enter in the editor and save:

dn: olcDatabase={1}mdb,cn=config
changeType: modify
add: olcAccess
olcAccess: to * by users read by anonymous auth by * none

This command adds authentication (by anonymous auth) and read permission to all people in the directory (by users read). Of course, it is not advisable to use such a configuration in real use. It is used here only for simple demonstration.

We add this setting to the directory:

ldapmodify -x -H ldap://localhost -D cn=admin,dc=ldaptuto,dc=net -w admin -f acces.ldif

Now, a query to read the data of the people in the directory by Jean Dupond (same as the previous one) makes it possible to display them.

ldapsearch -x -H ldap://localhost -D uid=dupond,ou=people,dc=ldaptuto,dc=net -w dupond -b ou=people,dc=ldaptuto,dc=net -LLL
dn: ou=People,dc=ldaptuto,dc=net
objectClass: organizationalUnit
ou: People

dn: uid=dupond,ou=People,dc=ldaptuto,dc=net
objectClass: inetOrgPerson
givenName: Jean
sn: Dupond
cn: Jean Dupond
uid: dupond
userPassword:: e1NTSEF9Umk1d0QrWEtmNHRrSHBOelBEMkdqU3NNSUhtRmtNU28=

Finally, the directory served by OpenLDAP allows Jean Dupond, who is referenced there, to authenticate and read all the data it contains. As an exercise you can add another person to the directory: Alain Durand. After that the contents of this directory will have this structure:

dc=ldaptuto,dc=net
├── cn=admin,dc=ldaptuto,dc=net
└── ou=People,dc=ldaptuto,dc=net
    ├── uid=dupond,ou=People,dc=ldaptuto,dc=net
    └── uid=durand,ou=People,dc=ldaptuto,dc=net

Openldap tutorial – organization and data types

In this 5th OpenLDAP tutorial, we’ll see how this directory server organizes its content. This is a necessary prerequisite to be able to put data to it. Once data is entered, the server will be ready for use. The main uses are: the authentication of users on the computer systems and the synchronization of data with these systems (e.g. email servers). The advantage of using LDAP servers for these functions is that this protocol has become a wide used standard. It’s supported by the most computer systems and applications that have this need.

A coming article will deal with data feeding.

Prerequisites:

1. Data organization in an OpenLDAP server

In an OpenLDAP server, the data is organized like a treeThere is the root of the tree: the DIT (Directory information tree), the trunk of the tree and moving after the trunk, we meet:

  • Nodes: Special type data that has the ability to contain other data.
  • Leaves: the data that can be of different types.

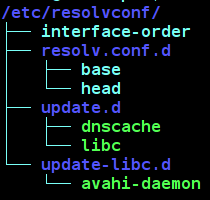
We can compare, by analogy, this organization to that of a file system on a computer disk. Here is the representation that would be obtained from the /etc/resolvconf folder by the command:

sudo tree /etc/resolvconf


– In blue, the nodes or folders in the file system.

– In light blue and green, the data or files in the file system.

To unambiguously designate the dnscache file for example, we use the full path (full qualified name – FQN): /etc/resolvconf/update.d/dnscache. This is necessary because there may be another file, which has the same name, somewhere else on the disk.

For an LDAP directory the equivalent of the FQN is the DN (distinguished name) and it is the complete path from the root (ie the DIT).

2. Data types in an OpenLDAP server

There are a very large number of data types that can be used by the OpenLDAP server. In addition, these data types are scalable and constantly evolving. In practice it is advisable to choose a limited set of these types of data according to actual needs. To do this we must declare the schemas to be embedded in the configuration of the server. A scema is a description of the data types (metadata).

This command lists the schemas embedded by the server:

ldapsearch -x -H ldap://localhost -s one -D cn=admin,dc=ldaptuto,dc=net -y pwdAdmin -b cn=schema,cn=config cn -LLL
dn: cn={0}core,cn=schema,cn=config
cn: {0}core

dn: cn={1}cosine,cn=schema,cn=config
cn: {1}cosine

dn: cn={2}nis,cn=schema,cn=config
cn: {2}nis

dn: cn={3}inetorgperson,cn=schema,cn=config
cn: {3}inetorgperson

The result is the one obtained just after the installation of an OpenLDAP server. These are the four embedded schema by default. They are sufficient for most basic uses of an LDAP directory.

3. The default contents of the OpenLDAP server

To get the full and actual contents of an OpenLDAP directory, you must run a search query in connected mode with the server administrator account (rootDN). This is the only account that is never subject to any access restrictions.

ldapsearch -x -H ldap://localhost -D cn=admin,dc=ldaptuto,dc=net -y pwdAdmin -b dc=ldaptuto,dc=net -LLL
dn: dc=ldaptuto,dc=net
objectClass: top
objectClass: dcObject
objectClass: organization
o: OpenLDAP tutorial
dc: ldaptuto

dn: cn=admin,dc=ldaptuto,dc=net
objectClass: simpleSecurityObject
objectClass: organizationalRole
cn: admin
description: LDAP administrator
userPassword:: e1NTSEF9RzlwcjRUdkRJajlWOWpqYjFzMTJkczhaaDBrY2pzOXA=

The result is the one obtained just after installing an OpenLDAP server. Notice the values entered during the installation (or reconfiguration).

  • cn=admin: the server administrator identifier.
  • o=OpenLDAP tutorial: The organization label.
  • dc=ldaptuto,dc=net: the DIT (domain name).
  • userPassword: administrator password (encrypted).

There are only two entries in the directory tree:

dc=ldaptuto,dc=net
└── cn=admin,dc=ldaptuto,dc=net

The values of the objectClass attribute determines the nature (or type) of the entry.

  • dc=ldaptuto, dc=net: has dcObject type, it is the special type that determines the root or DIT of the directory. This entry is the container for all data in this directory.
  • cn=admin,dc=ldaptuto,dc=net: has simpleSecurityObject type, data that represents an authentication account. Mainly contains the password of this account.

In upcoming articles we will see other types and will feed more the directory.